During my final internship, I had to deploy an application for large claims (major losses) reserving. Since the method chosen required some serious statistical modeling methods, I didn’t go with Excel/VBA. R seemed to be a good choice because of its statistical power and also of some useful R packages that deal with extreme values theory and distribution fitting. The question was: “How can I build a friendly-user application with R?”. The purpose is that the end users don’t need to open R and run a hundred line of R code. My first thought was to install RExcel in order to use Excel spreadsheet as the application interface. I had found a short presentation of how to use RExcel with the ChainLadder package in R but this solution seems to be a little out of date. Then I tried the TclTk package in R which is not so cool in my opinion! Finally I found something amazing called Shiny. It’s an R package that allows you to deploy an interactive web application with R.
Get inspired
To get you inspired, here’s a gallery of Shiny applications You will see that R users have made many amazing applications with Shiny. Since I only passed a little time during my internship to deploy the application (my main mission is to develop the actuarial model), I couldn’t build a very complex one, but it seems already more attractive than an Excel spreadsheet. It looks like this:
What is Shiny?
Ok, now we will look a little bit closer to Shiny. Firstly, Shiny proposes functions with R syntaxes that replace HTML, CSS, Javascript. Thus you can somehow build a web interface by writing R code. Secondly, Shiny has a feature called Interactivity, which is, in my opinion, a big difference in comparison to standard R programs. There’s an interaction between the client side (through the user interface) and the server side (your R program). Thirdly, you can run Shiny apps locally with RStudio and its browser or with R and a web browser such as Google Chrome or Internet Explorer. You can also upload your apps on a cloud (the Shiny server) and run them online. I didn’t try the last option because of the confidentiality concern. So I will show you in this post how to deploy and run a Shiny app locally on your computer.
Let’s begin by installing the Shiny package
install.packages("Shiny")How to learn Shiny?
The best way to learn Shiny, of course, is by watching the series of Shiny tutorials. It will cover all the Shiny topics from beginner to advanced level. It will however take time. What I did in my internship is to look at a simple Shiny example and then began directly to build my app. When there was something I didn’t know how to do, I googled it. It is maybe not a good habit of learning, but in a limit time constraint, it allowed me to build an application that meets all my needs (though it’s not optimal).
So the point is, the series of Shiny tutorials is where to start learning from. Other useful guides could be found on Google. Since I have passed some time on doing the same thing, I’ll try to list all the important points I have learned so far about Shiny in the next sections for you, so that you don’t have to google too many times when developing your Shiny app.
Shiny structure
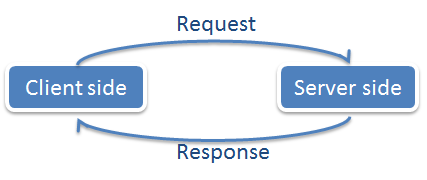
The logic of Shiny relies on the two notions that are very close to the web’s ones: client side and server side. Client side is the component in interaction with the end-users. Server side is the component through what your R program receives requests from users, runs R code and then sends the response to the client side.
Based on this principle, Shiny requires 2 R scripts: the first one for the User Interface, named ui.r, and the second one for the Server, named server.r. What you want to display on the interface needs to be declared in the ui.r script; how this thing is done needs to be defined in server.r. You can find below a typical structure of a Shiny application:
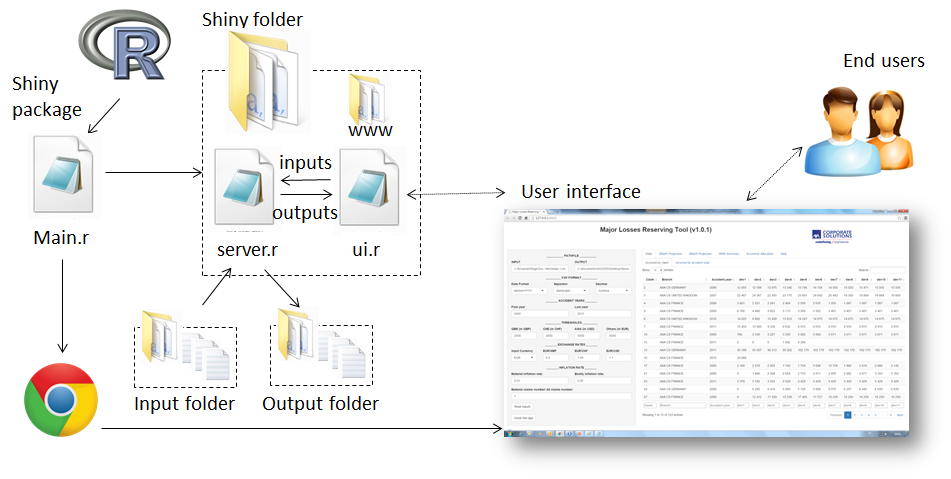
R calls the Shiny app in a main script, thanks to the Shiny package. I prefer to create a folder named Shiny folder where I store 2 principal elements: ui.r and server.r. You may notice that there is a third element named www. It’s a sub-folder where I store graphical elements (images, icons, etc.) and file (pdf) that I want to display on my application. (Attention, these three elements need to be named exactly that way). I did not show it in the scheme but the server.r can call other R scripts. Normally, an application has to read input files stored somewhere that I’ve named Input folder and write output files (in addition of displaying them on the user interface) in Output folder.
The user interface can be displayed on the default browser of RStudio if you run Shiny through it, or on a web browser (if you are using Internet explorer version < 10, you could get into trouble with Shiny). This user interface works exactly like a web page. There are buttons, input text, etc. for you to make your decision and there will be output (graphs, images, tables, etc.) displayed on the main panel, or separately on different tabs/panels.
Some Shiny codes
Choosing Browser
You can launch your Shiny app on the RStudio browser:
Shiny::runApp('./Shiny folder/')(An alternative way: in RStudio, when you open server.r and ui.r, you can see the Run App button on the top right. You can launch your app by clicking on it)
If you want to launch your app on your default web browser instead of RStudio browser:
Shiny::runApp('./Shiny folder/', launch.browser = TRUE)Shiny theme
Shiny has some pre-built themes for you. All you need to do is to install the shiny theme package and choose the theme you want.
Title panel
In ui.r, you can define a header for your application where you show the app name and the logo for example. This is done thanks to the titlePanel()
shinyUI(fluidPage(
    theme = shinytheme("cerulean"),

    # Application title
    titlePanel(
        fluidRow(
            column(9, strong("Name of you application"),align = "center" ),
            column(3,img(src = "logo.png", height = 72, width = 150))
        )
    ),

    sidebarLayout(
        sidebarPanel(...),
        mainPanel(...)
    )
)
Since the Shiny interface is a web interface, it is designed with the famous Bootstrap framework. The Shiny page is divided into 12 columns and all elements will be arranged according to these 12 columns. Here I divided the title panel into 2 parts, the first one takes 9/12 columns to show the app name, the second one takes 3/12 columns to show the logo. Please note that logo.png needs to be stored in the wwwsub-folder.
Tab panel
Look at the screenshot of the application I’ve created in my internship. There are different tab panels. You can create as many tab panels (and sub-tab panels) as you want.
mainPanel(

    tabsetPanel(
        tabPanel("tab 1",
            tabsetPanel(
                tabPanel("sub-tab 1a", dataTableOutput("st1a")),
                tabPanel("sub-tab 1b", dataTableOutput("st1b"))
            )
        ), # end of tab 1

        tabPanel("tab 2",
            tabsetPanel(
                tabPanel("sub-tab 2a", dataTableOutput("st2a")),
                tabPanel("sub-tab 2b", dataTableOutput("st2b"))
            )
        )
    )
Event reactivity
You want to add a button in the user interface so that your app does something in response to the users demand when they click on the button?
# in ui.r
# define the Inputs Reading button
actionButton("read_inputs","Read Inputs"),

# in server.r:
variable1 <- eventReactive(input$read_inputs, {
    # what you want to do when the user clicks on the button
},
Two ways of displaying a table
In server.r, to put a table into the output() list in order to display it on the user interface later, you can either use the renderTable() (not pretty) or the renderDataTable() (much more beautiful). With the second function, you can customize the table with options.
For example, if you want to show your entire table in one page and deactivate the search option:
example <- renderDataTable({
# your table
},options = list(searching = FALSE, searchable=FALSE, info=FALSE, paging = FALSE)
)
To customize the page length, the column width:
options = list(lengthMenu = list(c(15, 30, 50, -1), c('15', '30', '50', 'All')), pageLength = 15, autoWidth = TRUE, columnDefs = list(list(width = '200px', targets = 1)))Streamlining your Shiny apps
Sometimes, you need to order different parts of code in a given scenario. Unlike the normal logic of R, Shiny doesn’t interpret your code in the descending order. In server.r each bloc of code aims to return an output element and Shiny will interpret them almost simultaneously. It’s very often that one output element depends on others. In Shiny you need to tell the program when to do or to not do something.
The simplest way is to create reactive button so that a bloc of code will only be interpreted when the user clicks on the button. However, I find it not practical to create too many buttons.
A good way is to use reactive expressions that let you control which parts of your app update when. You can take a look at this tutorial for a better understanding of reactive expressions.
Every now and then, I find it more convenient to manually streamline my program by using reactiveValues as a condition. The idea is to create reactive boolean variables to trigger a bloc of code.
display.order <- reactiveValues(part2 = FALSE, part3 = FALSE)Conditional panel
In ui.r, you can tell Shiny when to show or not to show an output element with a specific condition:
conditionalPanel(condition = "input.currency == 'EUR'", ...)),
conditionalPanel(condition = "input.currency == 'GBP'", ...))
Loading circle
Every once in a while, it takes time to run your code and you want to tell the users that the R program is still running. Like a web page loading, you can show a loading circle whenever your R program is busy. To do so, you first need to save this “loading_circle.gif” image into the www folder,

and then add this line of code in the ui.r, in a specific area that you want to show the loading circle:
conditionalPanel(condition="$('html').hasClass('shiny-busy')",
tags$img(src="loading_circle.gif")
)
Close your app
2 options to close your app: create a button “close” in ui.r and add this in server.r:
observe({
    if(input$close > 0){
        stopApp(NULL)
    }
})
or close your app when the browser is closed:
shinyServer(function(input, output, session){
    session$onSessionEnded(function() {
        stopApp(NULL)
    })
})
Packaging
Until now, you still need to open R and launch Shiny from within it. If your app will be used by other people, it will be cool to create an independent desktop app that users can launch by clicking on an icon, like other applications in your computer. You can do it as followed.
Firstly, create a folder for you app, name it Your app for example, and then put all your tool elements in it (Main.r, Shiny folder, Input folder, Output folder)
R Portable
Building a desktop app with R is like packaging all necessary elements, R included, into a main folder. Why do you need to put R into your app folder? Because your app will be delivered to the clients, who don’t necessarily have R installed in their computer. A solution suggested by many people is to download R portable and put it in the main folder, with all other elements. Download R portable here. Put the folder R-Portable in Your app folder.
Web browser
Since we’re using R portable instead of RStudio, you definitely need a web browser. In case you are using Internet Explorer version < 10 which does not support Shiny, please either:
- update your IE browser,
- install GoogleChrome or Firefox and set them as your default web browser.
If you want to include a web browser into your app, you can download Google Chrome Portable here. Then put the GoogleChromePortable folder in Your app folder. I have tested it on different computers, sometimes it works, sometimes it doesn’t and I don’t know why. Anyway, I think nowadays people all have a modern web browser in their computer so you don’t need to prepare google chrome portable for them.
main.R
Now that our app works with a web browser, we need to specify it in our main.r script:
Shiny::runApp('./Shiny folder/', launch.browser = TRUE)Batch file
Now we’re moving to the most exciting step: creating a batch file to tell Windows what to do with the above script. Create a text file (with notepad or whatever you want), write down the below line of code, close and save it with a .bat extension name. For example, I name my batch file YourApp.bat.
SET ROPTS=--no-save --no-environ --no-init-file --no-restore --no-Rconsole
R-Portable\App\R-Portable\bin\Rscript.exe %ROPTS% main.R 1> ShinyApp.log 2>&1
This batch file tell your computer to find Rscript.exe in you R-Portable folder, use it to run main.r in order to call your Shiny app. You may notice the ShinyApp.log in the above line of code. This is to create a log file. All messages of R console, as well as messages from your print() function will be saved into the batch file.
Now your program will look like this:
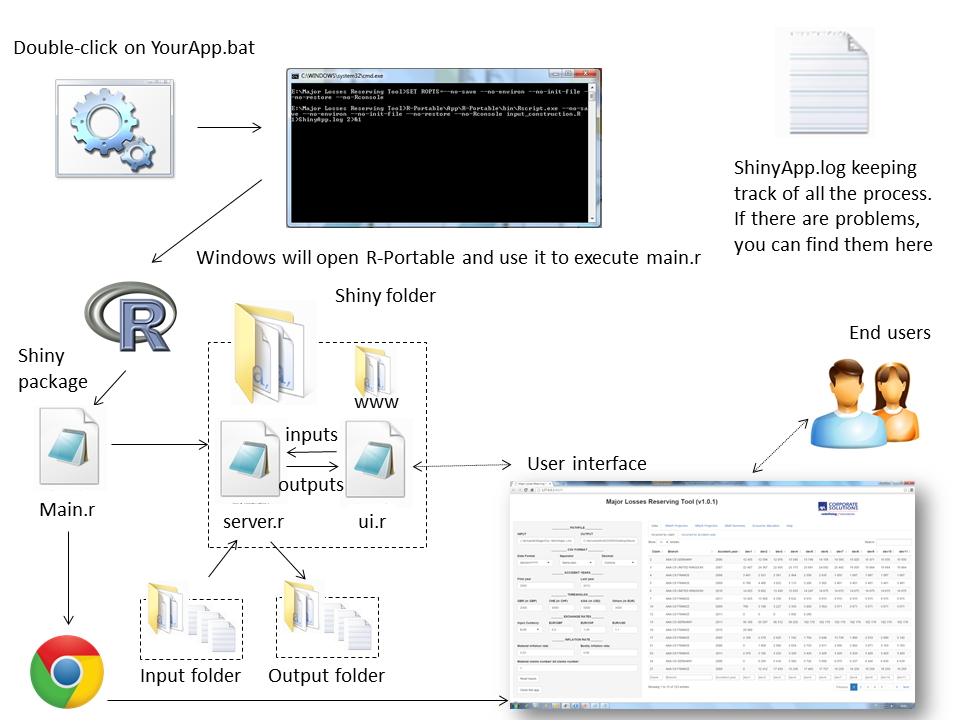
To launch your app, you just need to double click on your batch file. You can also create a shortcut for this batch file, set an icon for it, and put it anywhere on your computer to launch your app.
For more detail about deploying Desktop Apps with R, please visit: http://www.r-bloggers.com/deploying-desktop-apps-with-r/
comments powered by Disqus